Pattern Making Guide
Complete Pattern Drafting Toolkit: Master Pattern Making Like a Professional
15 July 2026 · 12 min read · By ONSA
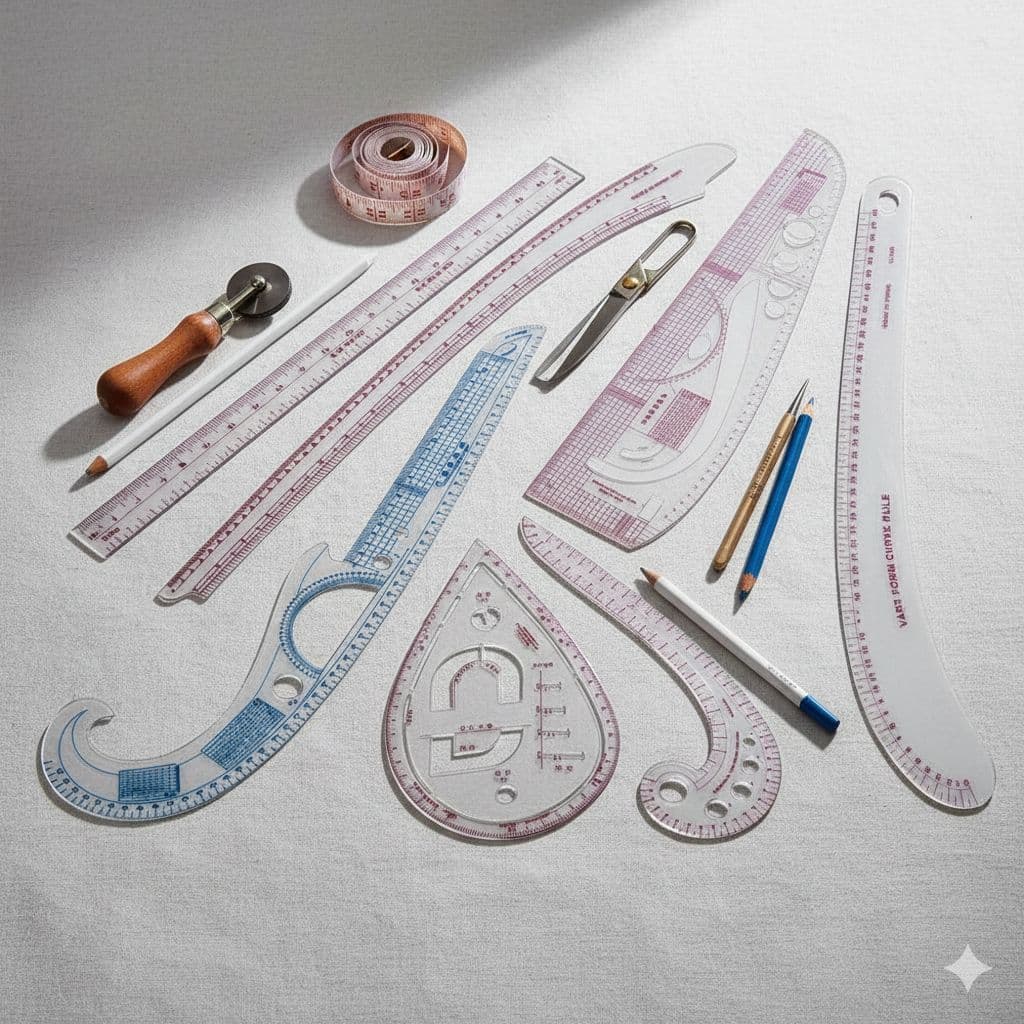
How do you think professional tailors get a pattern exactly right? It's not just experience — it's the right tools and the right technique.
Pattern drafting is the backbone of Indian tailoring. Whether you're making a kurta, a saree blouse, or western wear, the right pattern means the right fit. And the right fit means no re-stitching, no extra expense — just happiness.
This guide will teach you how to use a complete pattern drafting toolkit — from beginner to professional level. Whether you're sewing for yourself or for others, these tools will boost your accuracy by 100%.
What Is Pattern Drafting, and Why Does It Matter?
Pattern drafting is the art of converting body measurements onto paper. It's not a direct measurement — it's a mathematical calculation that turns a body shape into a 2D paper design.
Many beginner tailors use commercial patterns directly. But commercial patterns don't always give a perfect fit for Indian bodies. When you draft your own patterns, you keep 100% control — every curve, every angle, everything.
Pattern Drafting Toolkit: Complete Breakdown
1. Pattern Paper — The Foundation of Your Pattern
What it is: Pattern paper is strong, durable paper designed to be folded, unfolded, and traced over and over again.
Why it matters: Cheap paper tears, wrinkles, and ruins your pattern. Quality kraft paper or pattern paper protects your pattern for years.
At ONSA, we always say: a good pattern is a lifetime asset. Once you've made a perfectly fitting pattern, you'll use it again and again. If the paper is poor quality, the pattern gets lost with it.
2. Drafting Curves (French Curves) — The Secret to Smooth Lines
What it is: French curves are flexible rulers that match the natural curves of the human body. They come in different curve shapes.
The biggest mistake: Beginners try to draw curves with a straight ruler. The result? Zigzag, jagged lines that are uncomfortable and look unprofessional.
With French curves, you can draw smooth, flowing lines — armholes, necklines, waistlines — all perfectly following the body shape. Then when you cut the garment from that pattern, the fit comes out perfect automatically.
3. 1/4 Scale Ruler — Make It Small First, Then Go Full-Size
What it is: A special ruler where 1 inch = 1/4 inch. It lets you draft a full-size pattern at quarter size.
Professional workflow: Professional designers do their first draft on small paper, make adjustments, then scale up to full size. This approach saves a lot of time.
Say you want to experiment with a new design. Drafting at quarter scale takes 15 minutes. If you went straight to full size, it could cost you an hour and a whole meter of wasted fabric. And if the pattern doesn't fit, you'd have to cut again. A scale ruler eliminates that risk.
4. Pattern Guiding Ruler — The Language of Precision
What it is: A transparent, gridded ruler that lets you draw perfectly straight lines.
Why it matters most: Accuracy is everything in pattern drafting. A 2cm mistake can throw off the fit of the whole garment.
When you draw marking lines — grain lines, seam allowances, darts — everything needs to be perfectly straight. If you draw free-hand, even carefully, there will always be slight angles off. A good ruler, combined with a mechanical pencil, gives you exact precision.
Skill Levels: Basic to Professional
Level 1: Basic Pattern Drafting
What you should learn:
- • Taking body measurements accurately (covered in our previous blog)
- • Drawing horizontal and vertical lines with a straight ruler
- • Drafting a basic A-line skirt or simple kameez pattern
- • Adding seam allowances
- • Clearly labeling the pattern
Tools that are enough: 12-inch ruler, pattern paper, mechanical pencil, measuring tape
At the basic level, you make simple, straight patterns. No curves, just rectangles and straight seams. A salwar, a straight kameez, a basic skirt — all of these are possible at basic level.
Level 2: Intermediate Pattern Making
What you should learn:
- • Drawing armholes and necklines with French curves
- • Adding darts (for fitting)
- • Experimenting with A-line, fitted, flared designs
- • Testing prototypes with a quarter-scale ruler
- • Grading patterns for multiple sizes
Tools that now matter: Drafting curves (French curves), 1/4 scale ruler, quality pattern paper, pattern storage system
At the intermediate level, you can develop your own signature style. You start knowing which curves work for which shapes. You can add darts to make fitted garments that sit just right.
Level 3: Professional Pattern Design
What you should be able to do:
- • Design custom patterns for different body types
- • Draft complex designs (asymmetrical, wrap, layered)
- • Grade professionally (size 28 to 42)
- • Maintain a pattern library with detailed records
- • Quickly prototype and test new designs
- • Adjust patterns for a client's unique measurements
Complete toolkit you should have: Multiple French curve sets, quality scale rulers (1/4, 1/2), premium pattern paper, transparency sheets for grading, pattern folders for organization, measurement software or a notebook
At the professional level, you're a designer, not just a tailor. You keep your patterns as data. A client walks in, you take measurements, and in 20 minutes their perfect fitting pattern is ready — that's what professional level looks like.
Step-by-Step: Draft Your First Pattern
Step 1: Take measurements — Bust, waist, hip, shoulder width, length. You'll find detailed steps in our body measurement guide.
Step 2: Draw a grid — Draw a grid on the pattern paper with a ruler. This helps you maintain scale.
Step 3: Draw the main seam lines — Vertical and horizontal lines with a ruler. Every line needs to be precisely straight.
Step 4: Add the curves — Armholes and necklines with a French curve. Every curve should be natural, not angular.
Step 5: Add seam allowances — 0.75 inch or 2cm for all seams. Mark clearly.
Step 6: Label everything — Pattern piece name, size, grain line, how many pieces to cut. Clear labeling means no confusion later.
Common Mistakes and How to Avoid Them
❌ Mistake 1: Inaccurate Measurements
If the measurements are wrong, the whole pattern is wrong. Always measure twice. Have someone else measure too, if possible.
❌ Mistake 2: Free-Hand Curves
Drawing curves without a French curve results in jagged lines. Always use proper curves, even if it takes more time.
❌ Mistake 3: Forgetting Seam Allowances
Many beginners forget to add seam allowances. Result: your garment comes out too small because the cutting line itself was wrong.
❌ Mistake 4: Not Testing Before Cutting Fabric
Cutting directly on expensive fabric is a gamble. Always test first on muslin (cheap cotton). Then adjust. Then cut the expensive fabric.
FAQ: About the Pattern Drafting Toolkit
Q: Should I use digital software for patterns?
Not at the start. Hand drafting teaches you the fundamentals. Software can come later.
Q: How many years can I store pattern paper?
In a dry place, 10+ years. Quality paper never really wears out. Just don't keep folding it repeatedly.
Q: Do different body types need different patterns?
Yes! Pear shapes, apple shapes, hourglass — each needs different adjustments. This is the real art of professional tailoring.
Q: Can I make my own patterns from commercial patterns?
Yes, but you'll need to adjust them. Commercial patterns are made for average bodies, not every body.
Start Your Pattern Drafting Journey
Pattern drafting is a skill that can take years of experience to master. But with the right tools and guidance, you can learn it much faster. At ONSA, we've seen students making professional-level patterns in 3-4 months with the right tools.
Start small. One simple A-line skirt. Then a straight kameez. Then gradually increase the complexity. Every pattern teaches you how curves work, how to adjust seam allowances, and how to improve fit.
"A good pattern means a good garment. It's not just fabric — it's confidence."
Want to Become an Expert in Pattern Drafting?
In ONSA's structured courses, you'll learn step-by-step — from taking measurements to designing professional patterns.
ONSA — Online Sewing Academy has taught 3000+ students across India, UAE, USA, Canada, and 12+ countries in sewing and fashion design. Every student is converting their experience into a successful business or skill.